


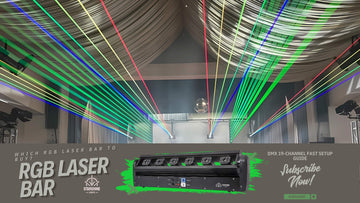
RGB Laser Bar DMX Quickstart: 19-Channel Cabling That Just Works
You’ve got a new toy and a dance floor to light. This guide gets your 19-channel DMX show running on a coffee-break timeline— from first cable to first tunnel. For small venues and mobile rigs, a well-placed B4 RGB Laser Bar delivers big-room looks without big-show headaches. Let’s plug in, power up, and press play.
 What you need (no surprises)
- DMX controller (or software + USB/Art-Net node)
- 3-pin or 5-pin DMX cables + one terminator
- Power cables and safety hardware (clamps, safeties)
- Address stickers/tape pen
- Haze machine (light, even haze = visible beams)
 Address planning in 60 seconds (3-bar linear array)
Goal: three units in a line over the booth for clean fan and tunnel looks.
Mount height: 2.2–2.8 m, slight down-angle (10–20°), outer two bars fanned slightly outward.
If you’re new to the format: an RGB laser bar shines when you scale horizontally. Add more bars = wider, smoother coverage—no pan/tilt wrestling.
- Unit A → Address 001
- Unit B → Address 020 (001 + 19)
- Unit C → Address 039 (001 + 19 + 19)
Mount height: 2.2–2.8 m, slight down-angle (10–20°), outer two bars fanned slightly outward.
If you’re new to the format: an RGB laser bar shines when you scale horizontally. Add more bars = wider, smoother coverage—no pan/tilt wrestling.
 19-channel cheat sheet (the “good enough” map)
Every manufacturer maps channels a little differently, but this typical 19-ch logic gets you rolling fast (always check your manual for exact values):
• Warm-up Fan: Ch2 mid, Ch3 slow, Ch4 open, Eyes 1–6 all on, tiny Y-swing.
• Tunnel for the Drop: Ch2 tunnel macro, Ch3 medium, Eyes 1–6 on, Y-swing centered.
• Strobe Chase: Ch4 strobe 6–8 Hz, Eyes 1–6 alternating (7–12 step), slight Y-swing.
- Mode/Dimmer Enable
- Effect / Macro Select
- Effect Speed
- Strobe / Shutter
- Color / Pattern Group
- Color / Pattern Speed
- Eyes/Sections on–off (7–12)
- —
- —
- —
- —
- —
- Y-Swing (Bar Tilt) / Angle Macro
- Y-Swing Speed / Range
- Auto Program Select
- Auto Program Speed
- Sound-Active Sensitivity
- Function / Reset / Blackout
- Reserved / Fine / Special
• Warm-up Fan: Ch2 mid, Ch3 slow, Ch4 open, Eyes 1–6 all on, tiny Y-swing.
• Tunnel for the Drop: Ch2 tunnel macro, Ch3 medium, Eyes 1–6 on, Y-swing centered.
• Strobe Chase: Ch4 strobe 6–8 Hz, Eyes 1–6 alternating (7–12 step), slight Y-swing.
Master–slave in two minutes (when the DJ is already mixing)
- Put Unit A in Master (Auto or Sound).
- Put B/C to Slave (DMX off).
- Daisy-chain signal like normal; keep the terminator on the last unit.
- Dial sensitivity so kicks trigger but vocals don’t.
Sound-active & Auto (the night-shift rescue modes)
- Sound-active: set sensitivity, give it a steady kick source, keep haze light.
- Auto: pick a slower program for open hours, a faster one for peak.
Troubleshooting you’ll actually use
- No response: wrong address/Universe, or last fixture forgot to terminate.
- Random flashes: cables > 100 m total, or mic cables instead of DMX.
- Only some eyes work: you disabled a section (Ch7–12). Re-enable one by one.
- Tunnel looks mushy: too much fog. Use light, even haze.
- Overheating: direct sun + closed cover. Add airflow or shade, not just rain protection.
Download zone (copy-paste friendly)
DMX address plan (CSV)
Fixture,Address,Mode,Notes
Bar A,001,19ch,Center
Bar B,020,19ch,Left
Bar C,039,19ch,Right
Show rundown (CSV)
Cue,Look,Notes
1,Warm-up Fan,Slow speed low Y-swing
2,Build,Add alternating eyes
3,Drop,Tunnel macro medium speed
4,Break,Static fan no strobe
5,Peak,Strobe chase 6-8Hz
Quick reference card (print this)
- Haze: light + even → beams pop, photos look clean.
- Angles: small down-angle, small outward fan, keep heads above eye line.
- Safety: no audience scanning; clamps & safeties every time.
- Reset: remember your blackout/kill channel before power down.
FAQ
How do I set DMX addresses for multiple laser bars?
Pick a base (001), then add 19 for each additional bar (001 → 020 → 039). Put a terminator on the last unit.
What is the fastest way to link master-slave on a laser bar?
Set A to Master (Auto/Sound), B/C to Slave, chain signal A→B→C, adjust sensitivity. Done.
Why does my laser bar not respond to DMX?
Check Universe, address, and that you’re using DMX cables (not mic cables). Add a terminator; long runs need proper DMX-spec cabling.
Ready to roll?
If you want the shortest path from setup to fan/tunnel magic, build your rig around the B4 RGB Laser Bar first, then scale: one today, two next month, three for the holiday crush. Your crowd won’t know how easy it was—you will.